Fall 2019
PHYSICAL COMPUTING // EXPERIENCE DESIGN // INTERACTION DESIGN // FABRICATION // INSTALLATIOn DESIGN
ONE AMONGST MANY

One Amongst Many: Connecting Women in Computing is a 6 week multi-disciplinary design project completed in collaboration with Christina Dacanay and Shirley Wu.
As women in the computing field, we felt the need to address the fact that so many astonishing milestones within computer science were accomplished by women. This is such a little-known fact to the vast majority of people, even to the ones within our field. We wanted to create something that would both inform and inspire others, especially young women, to have the courage to pursue great things in areas that are perceived to be male-doninant.
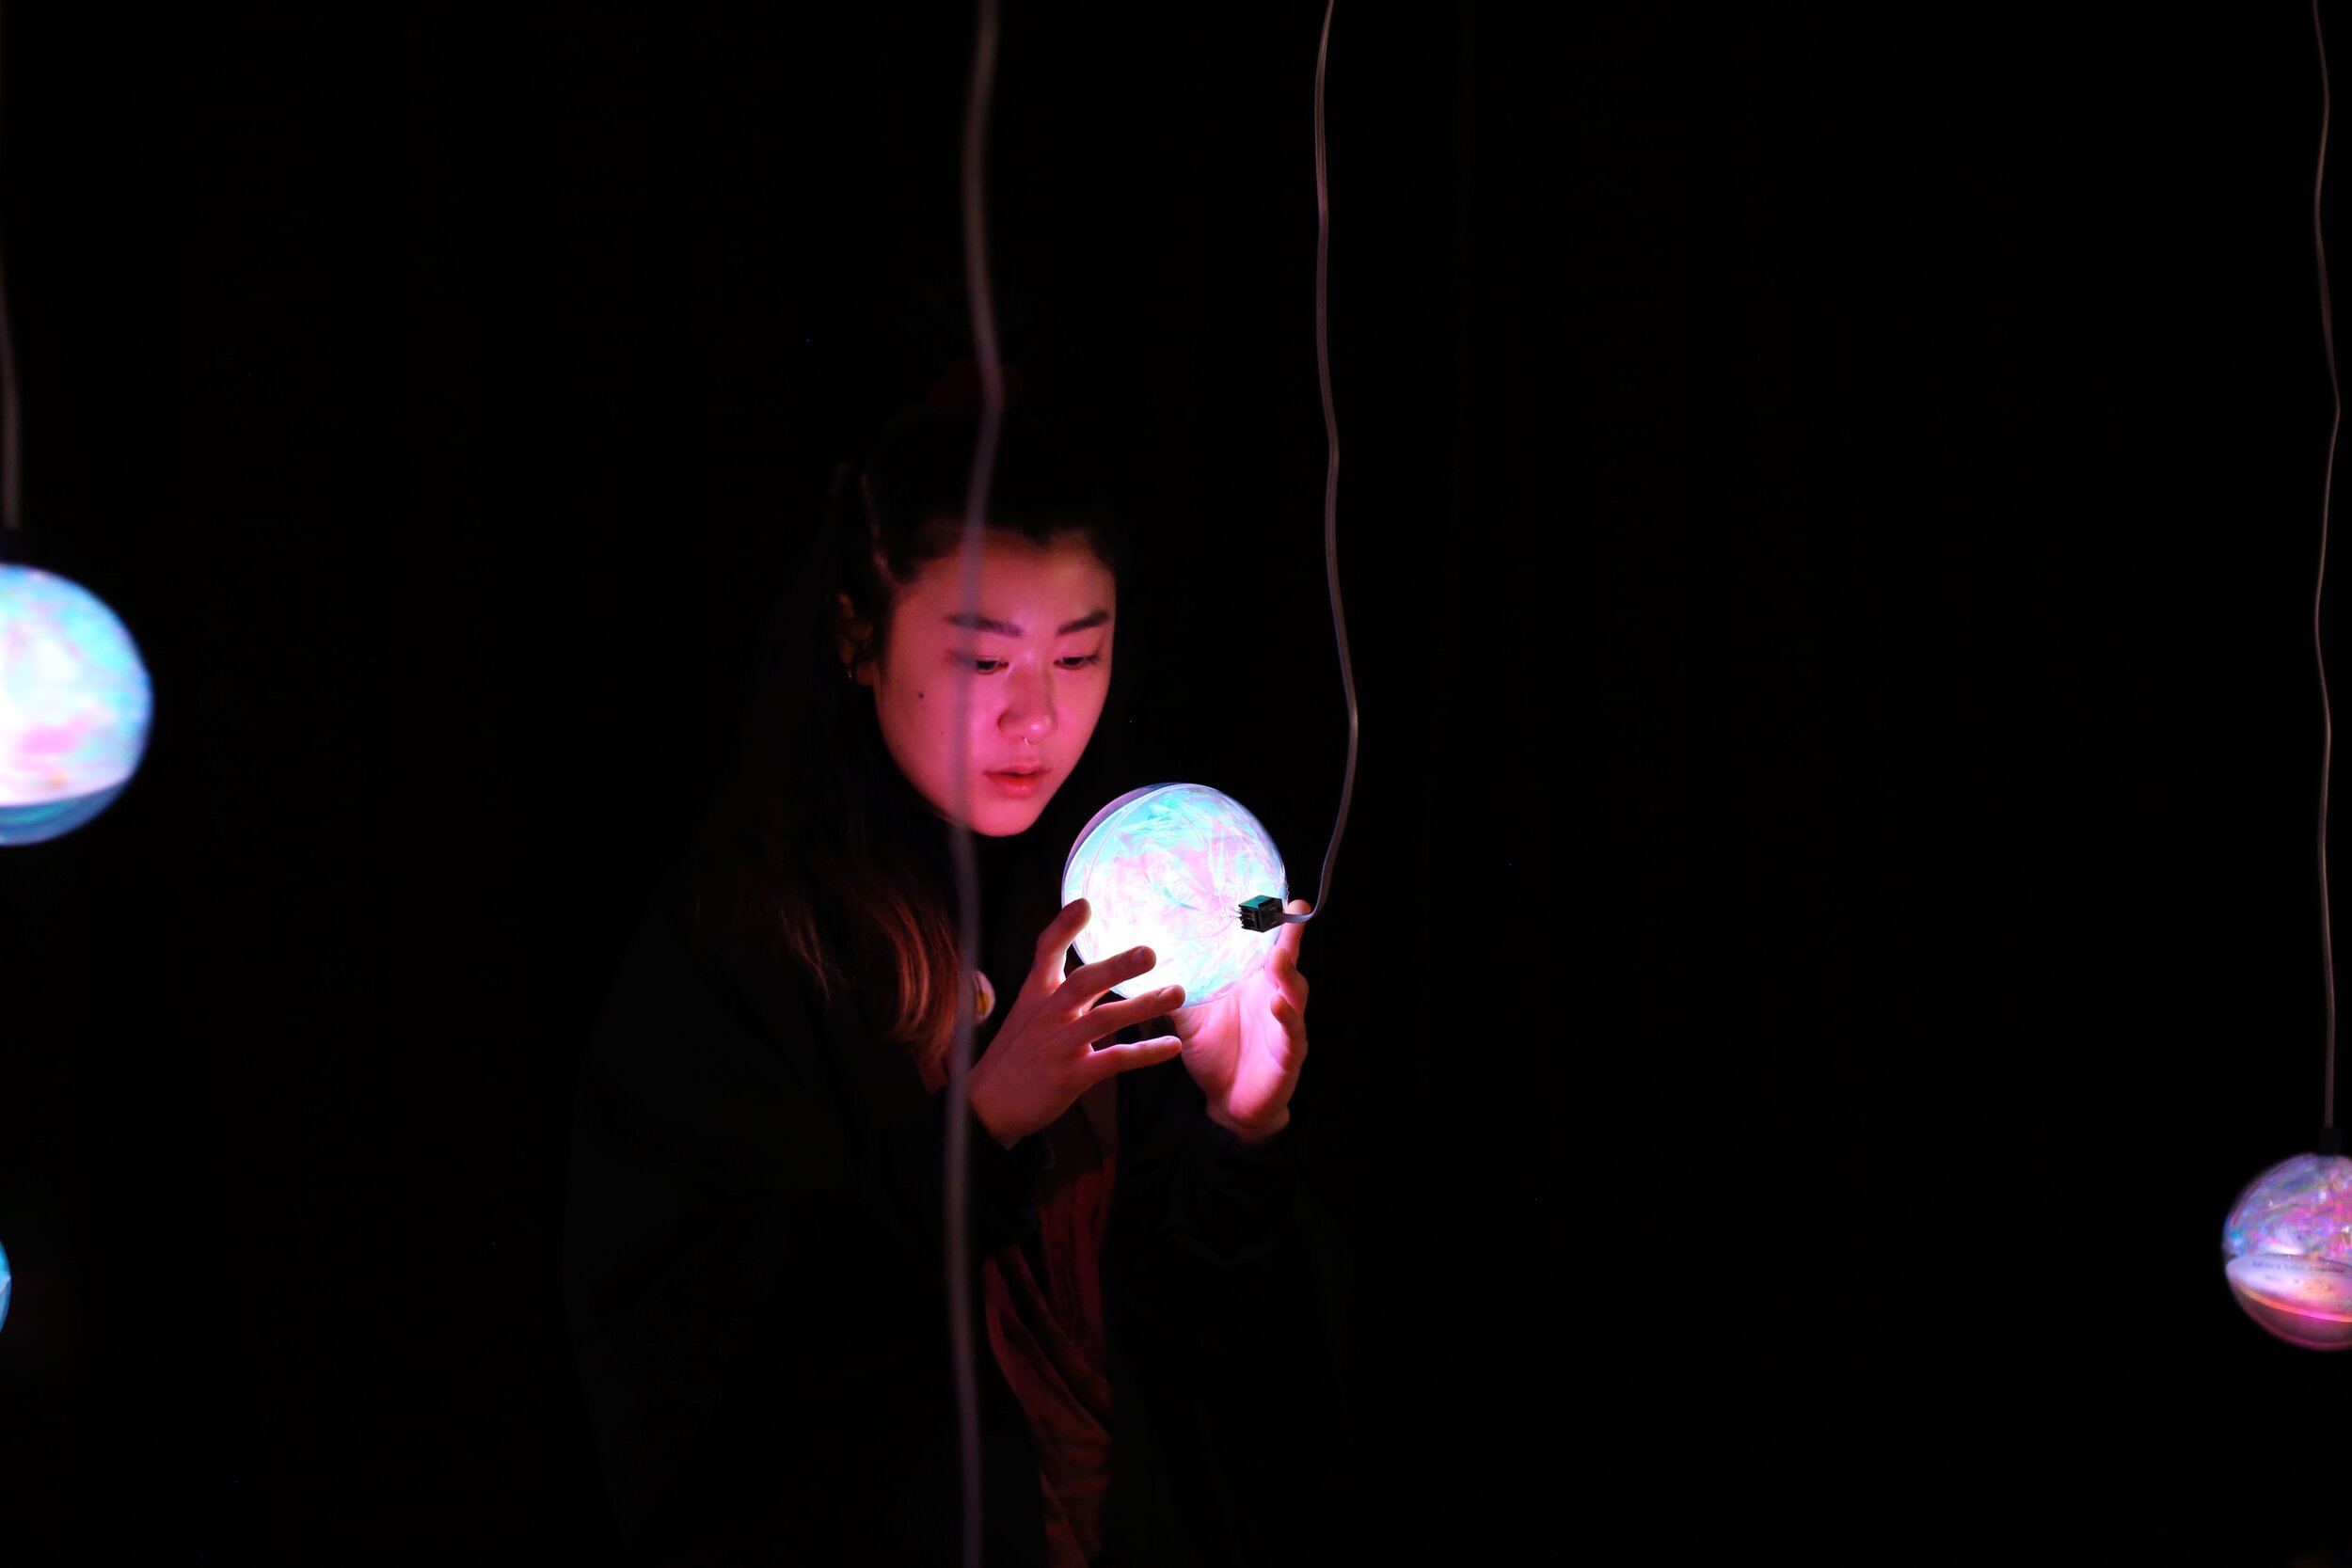
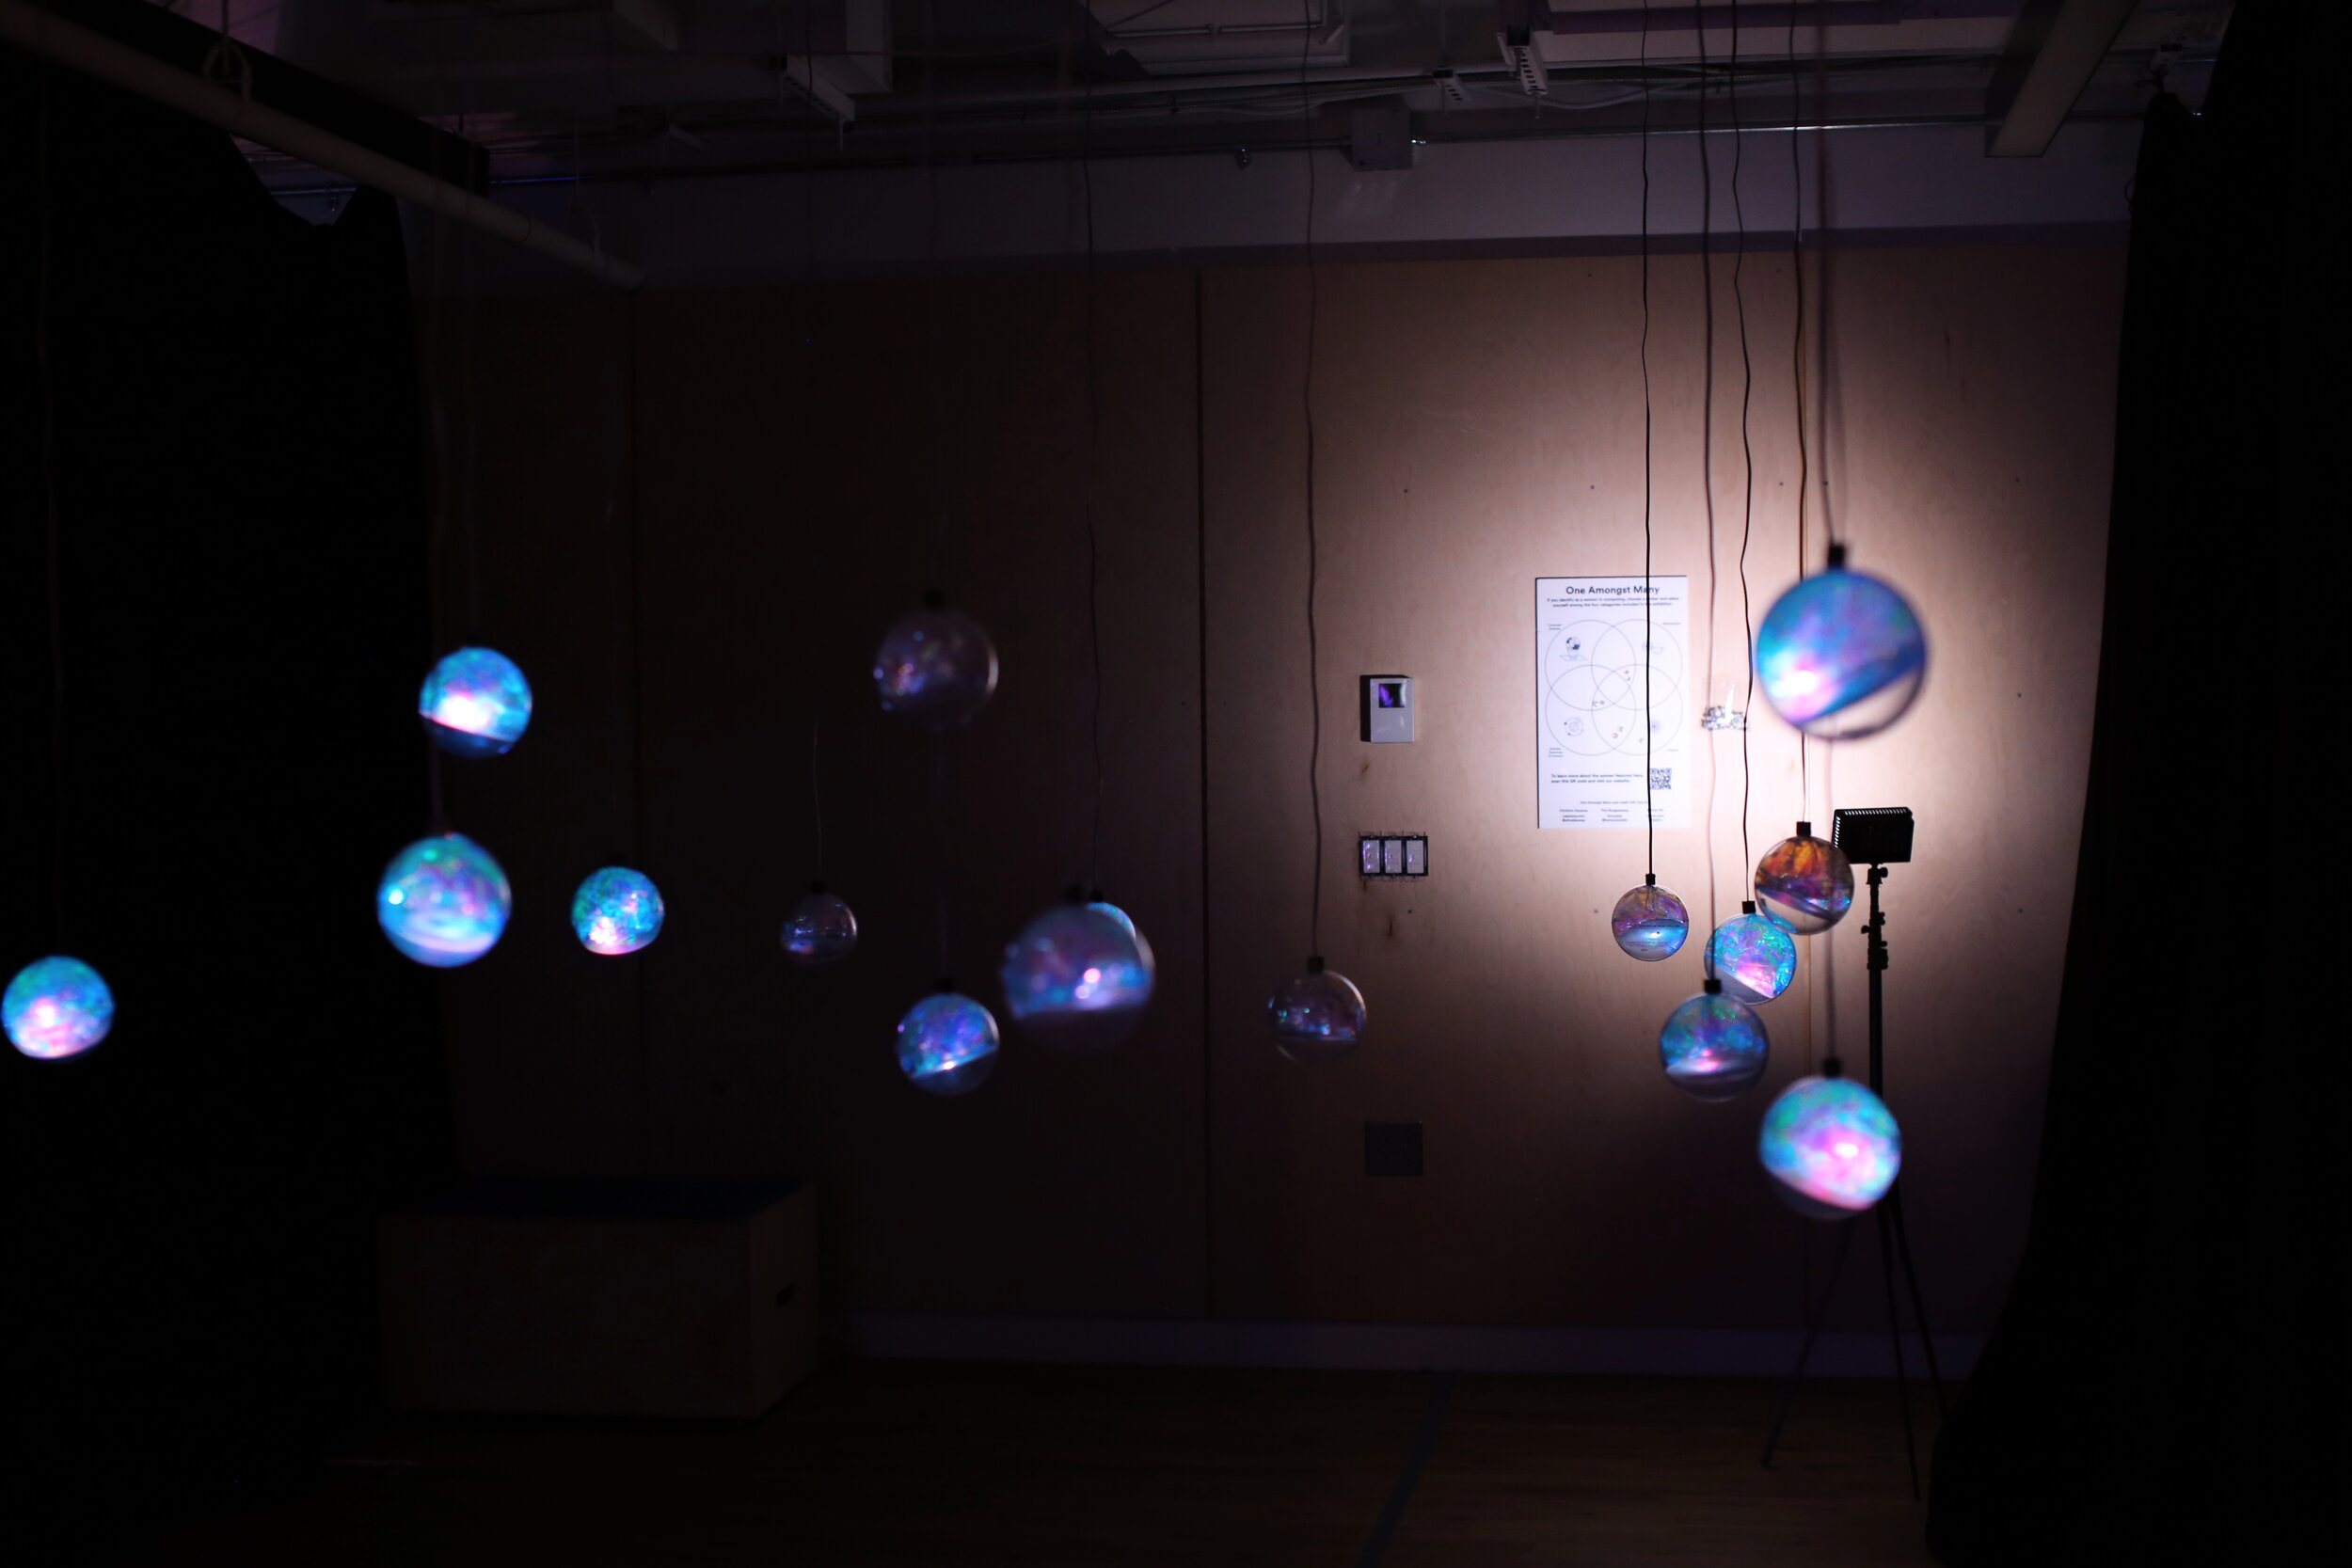
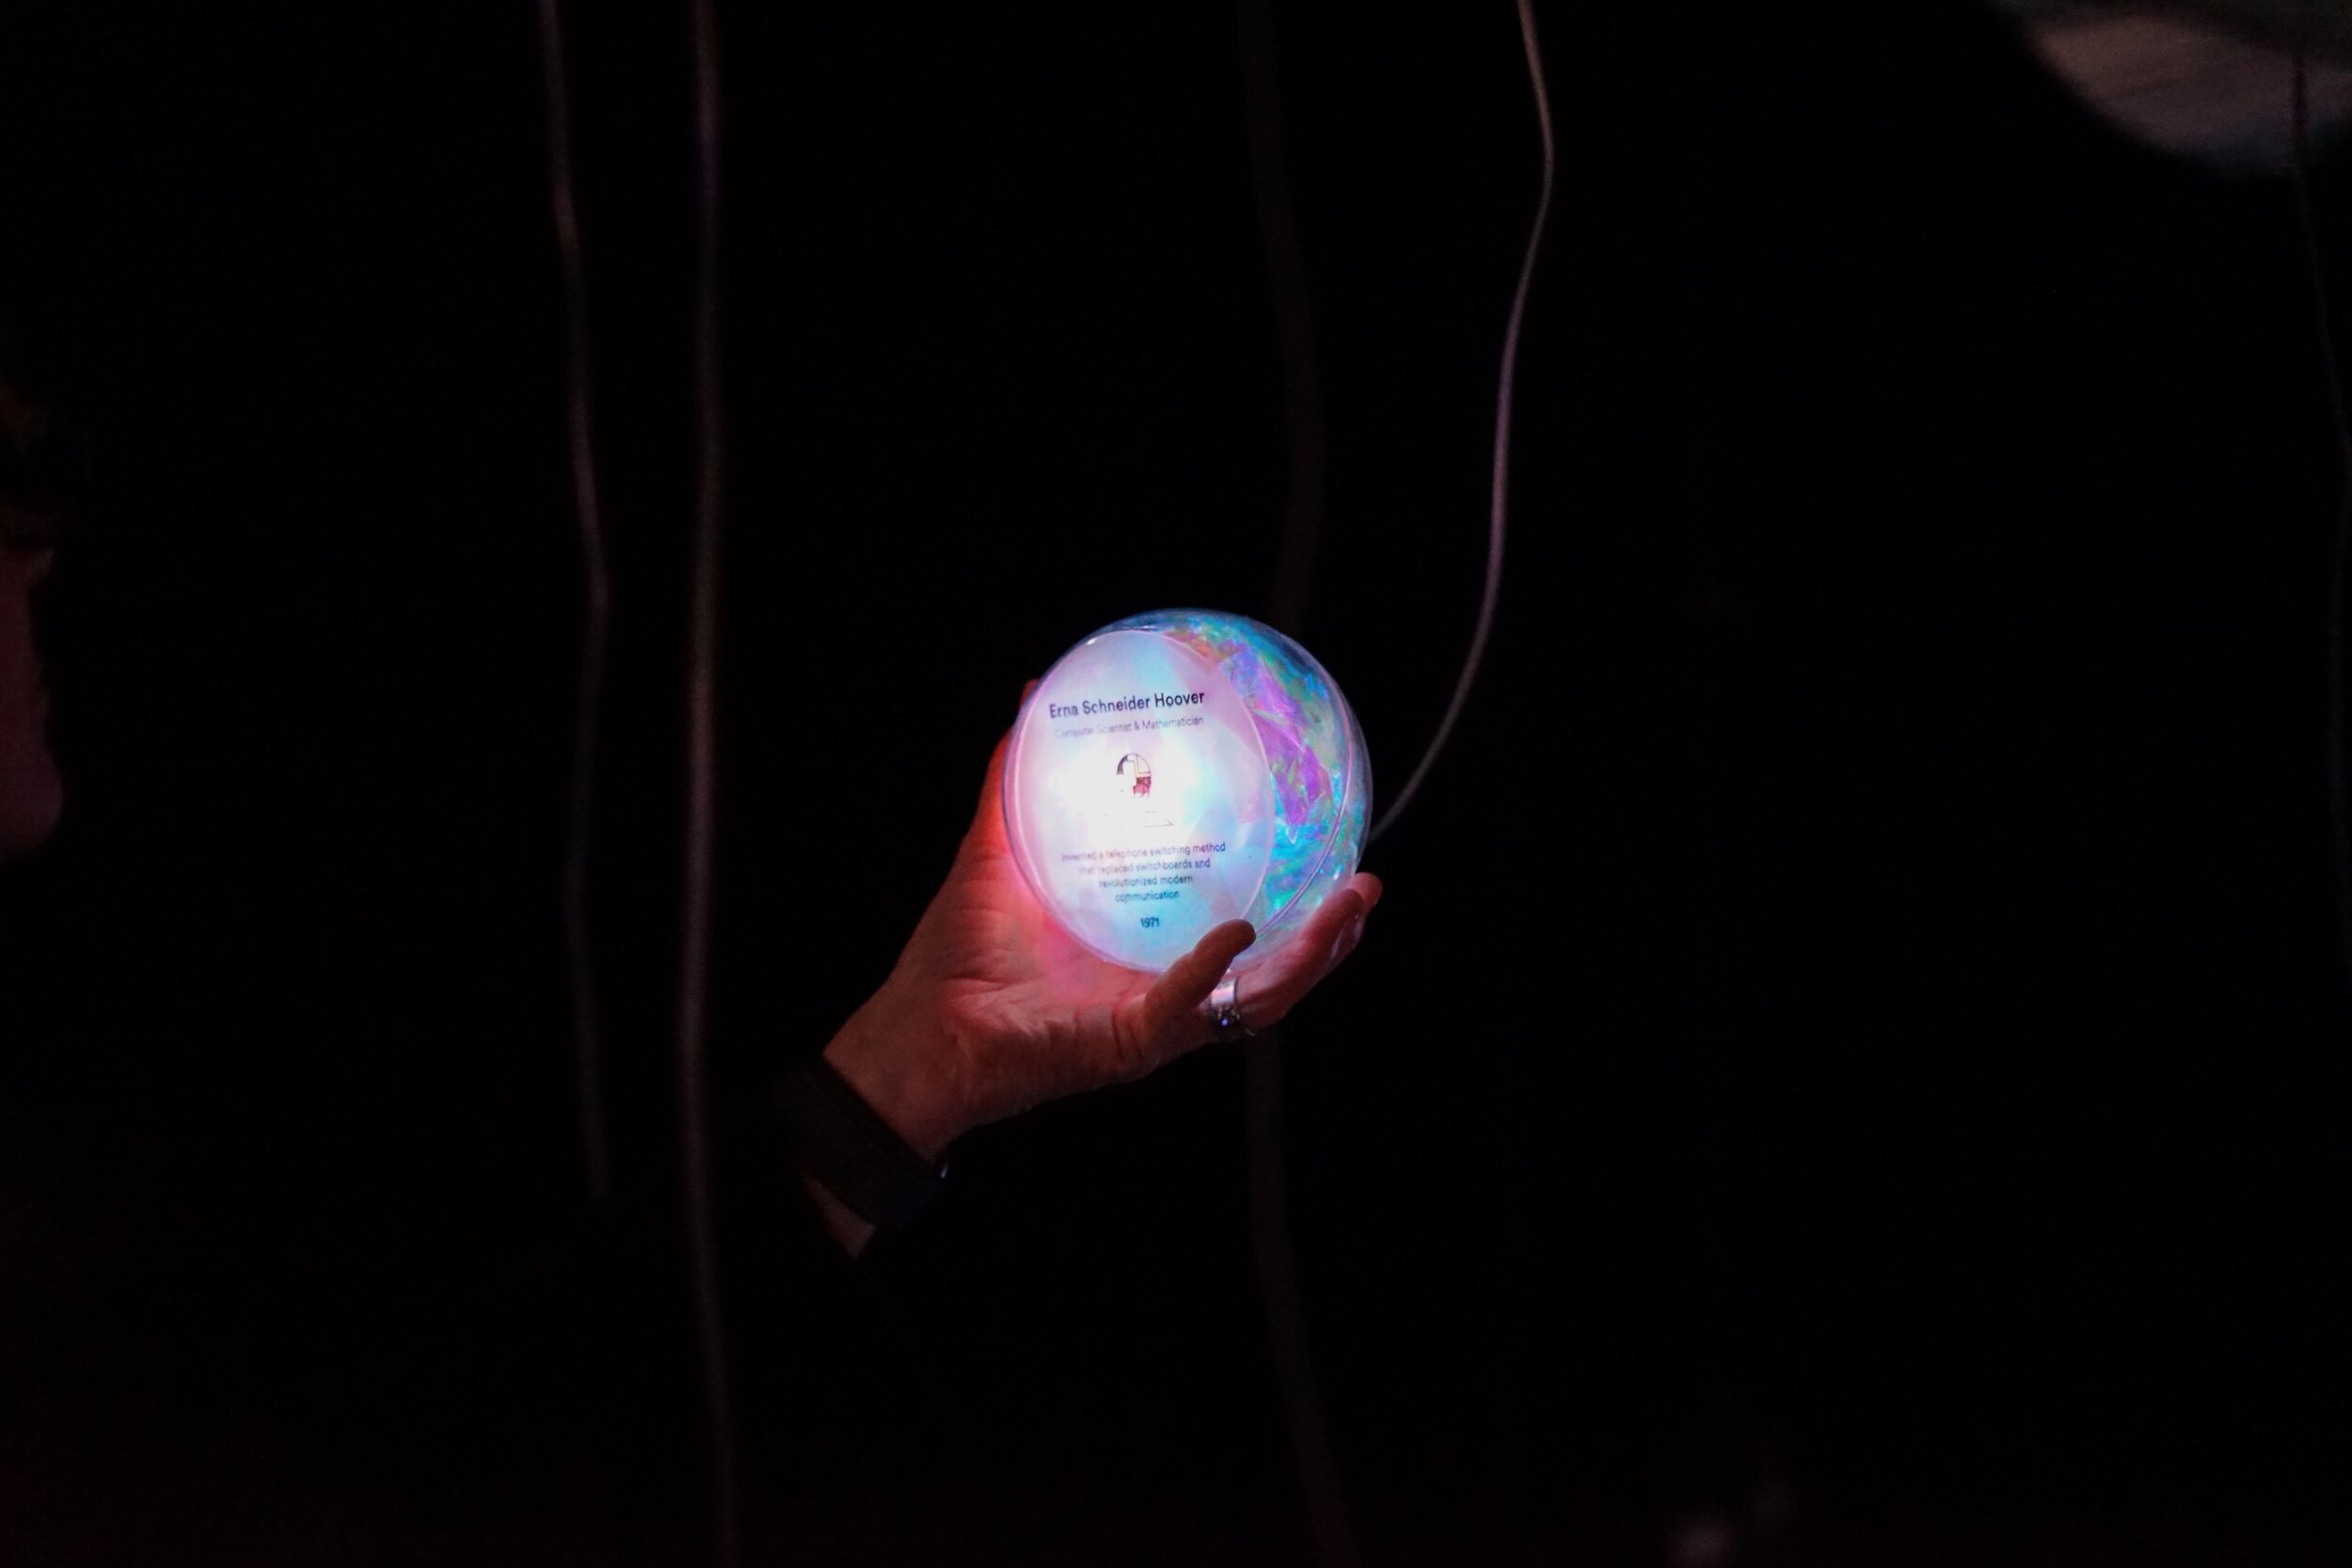
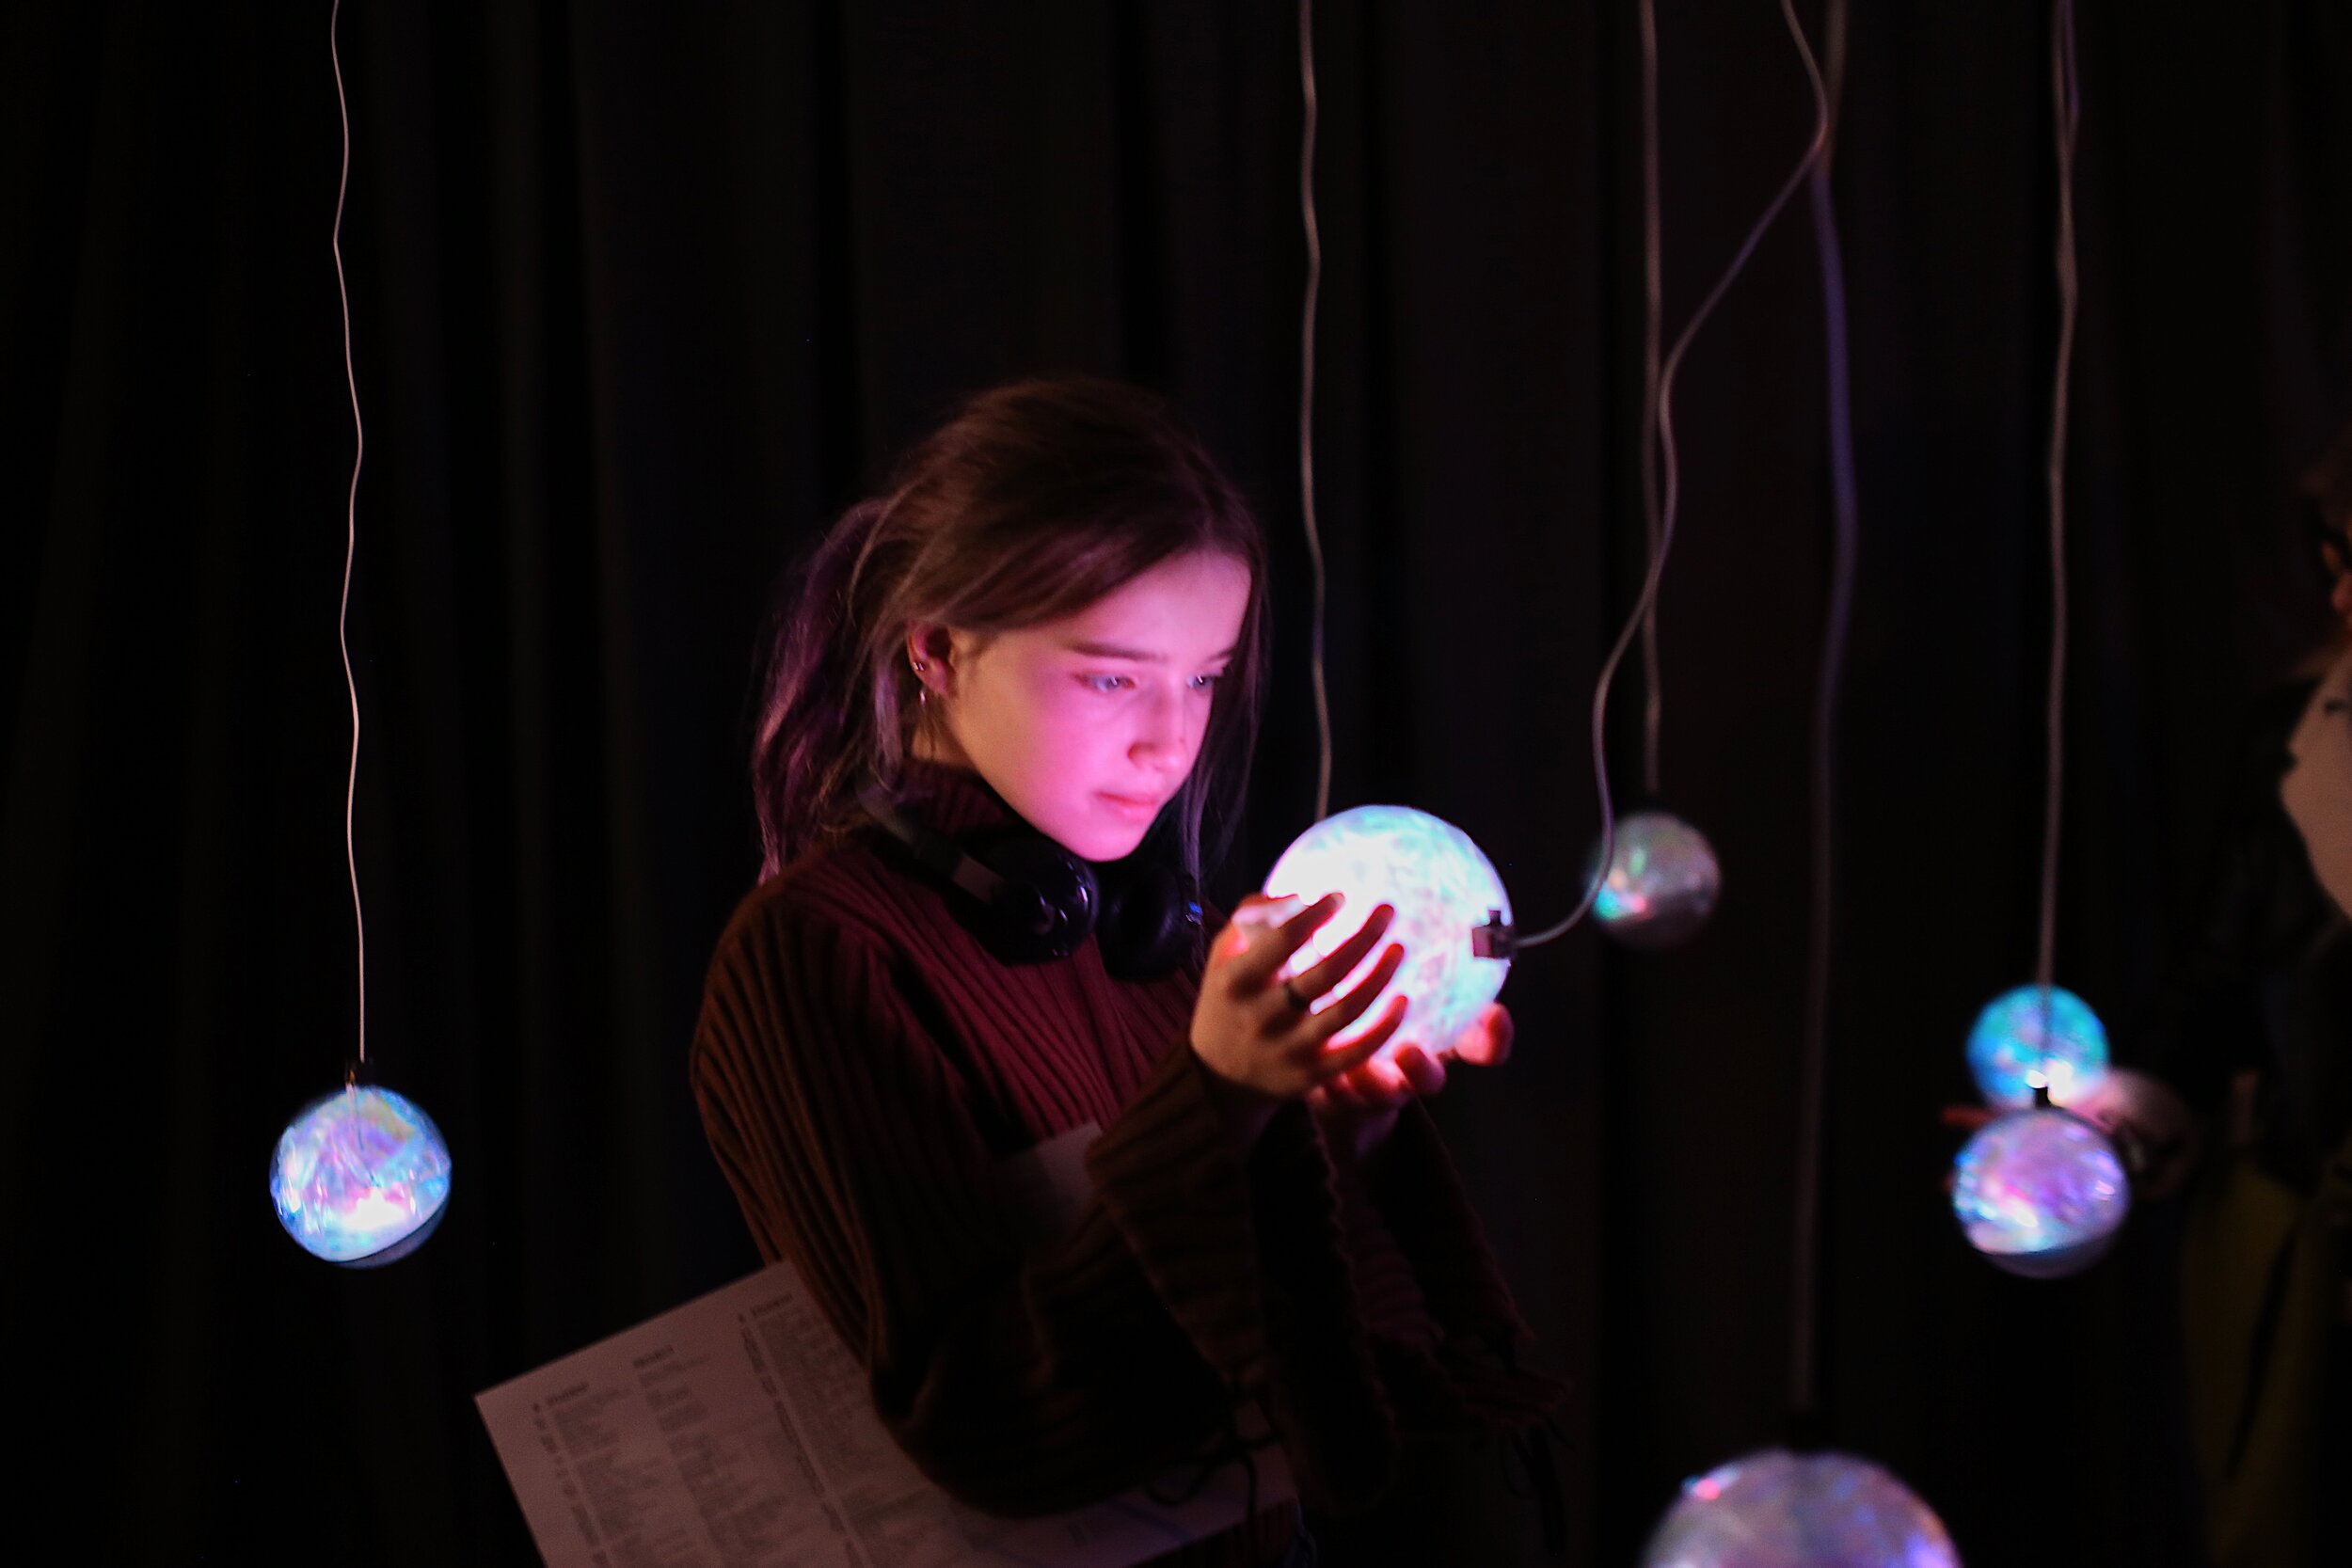
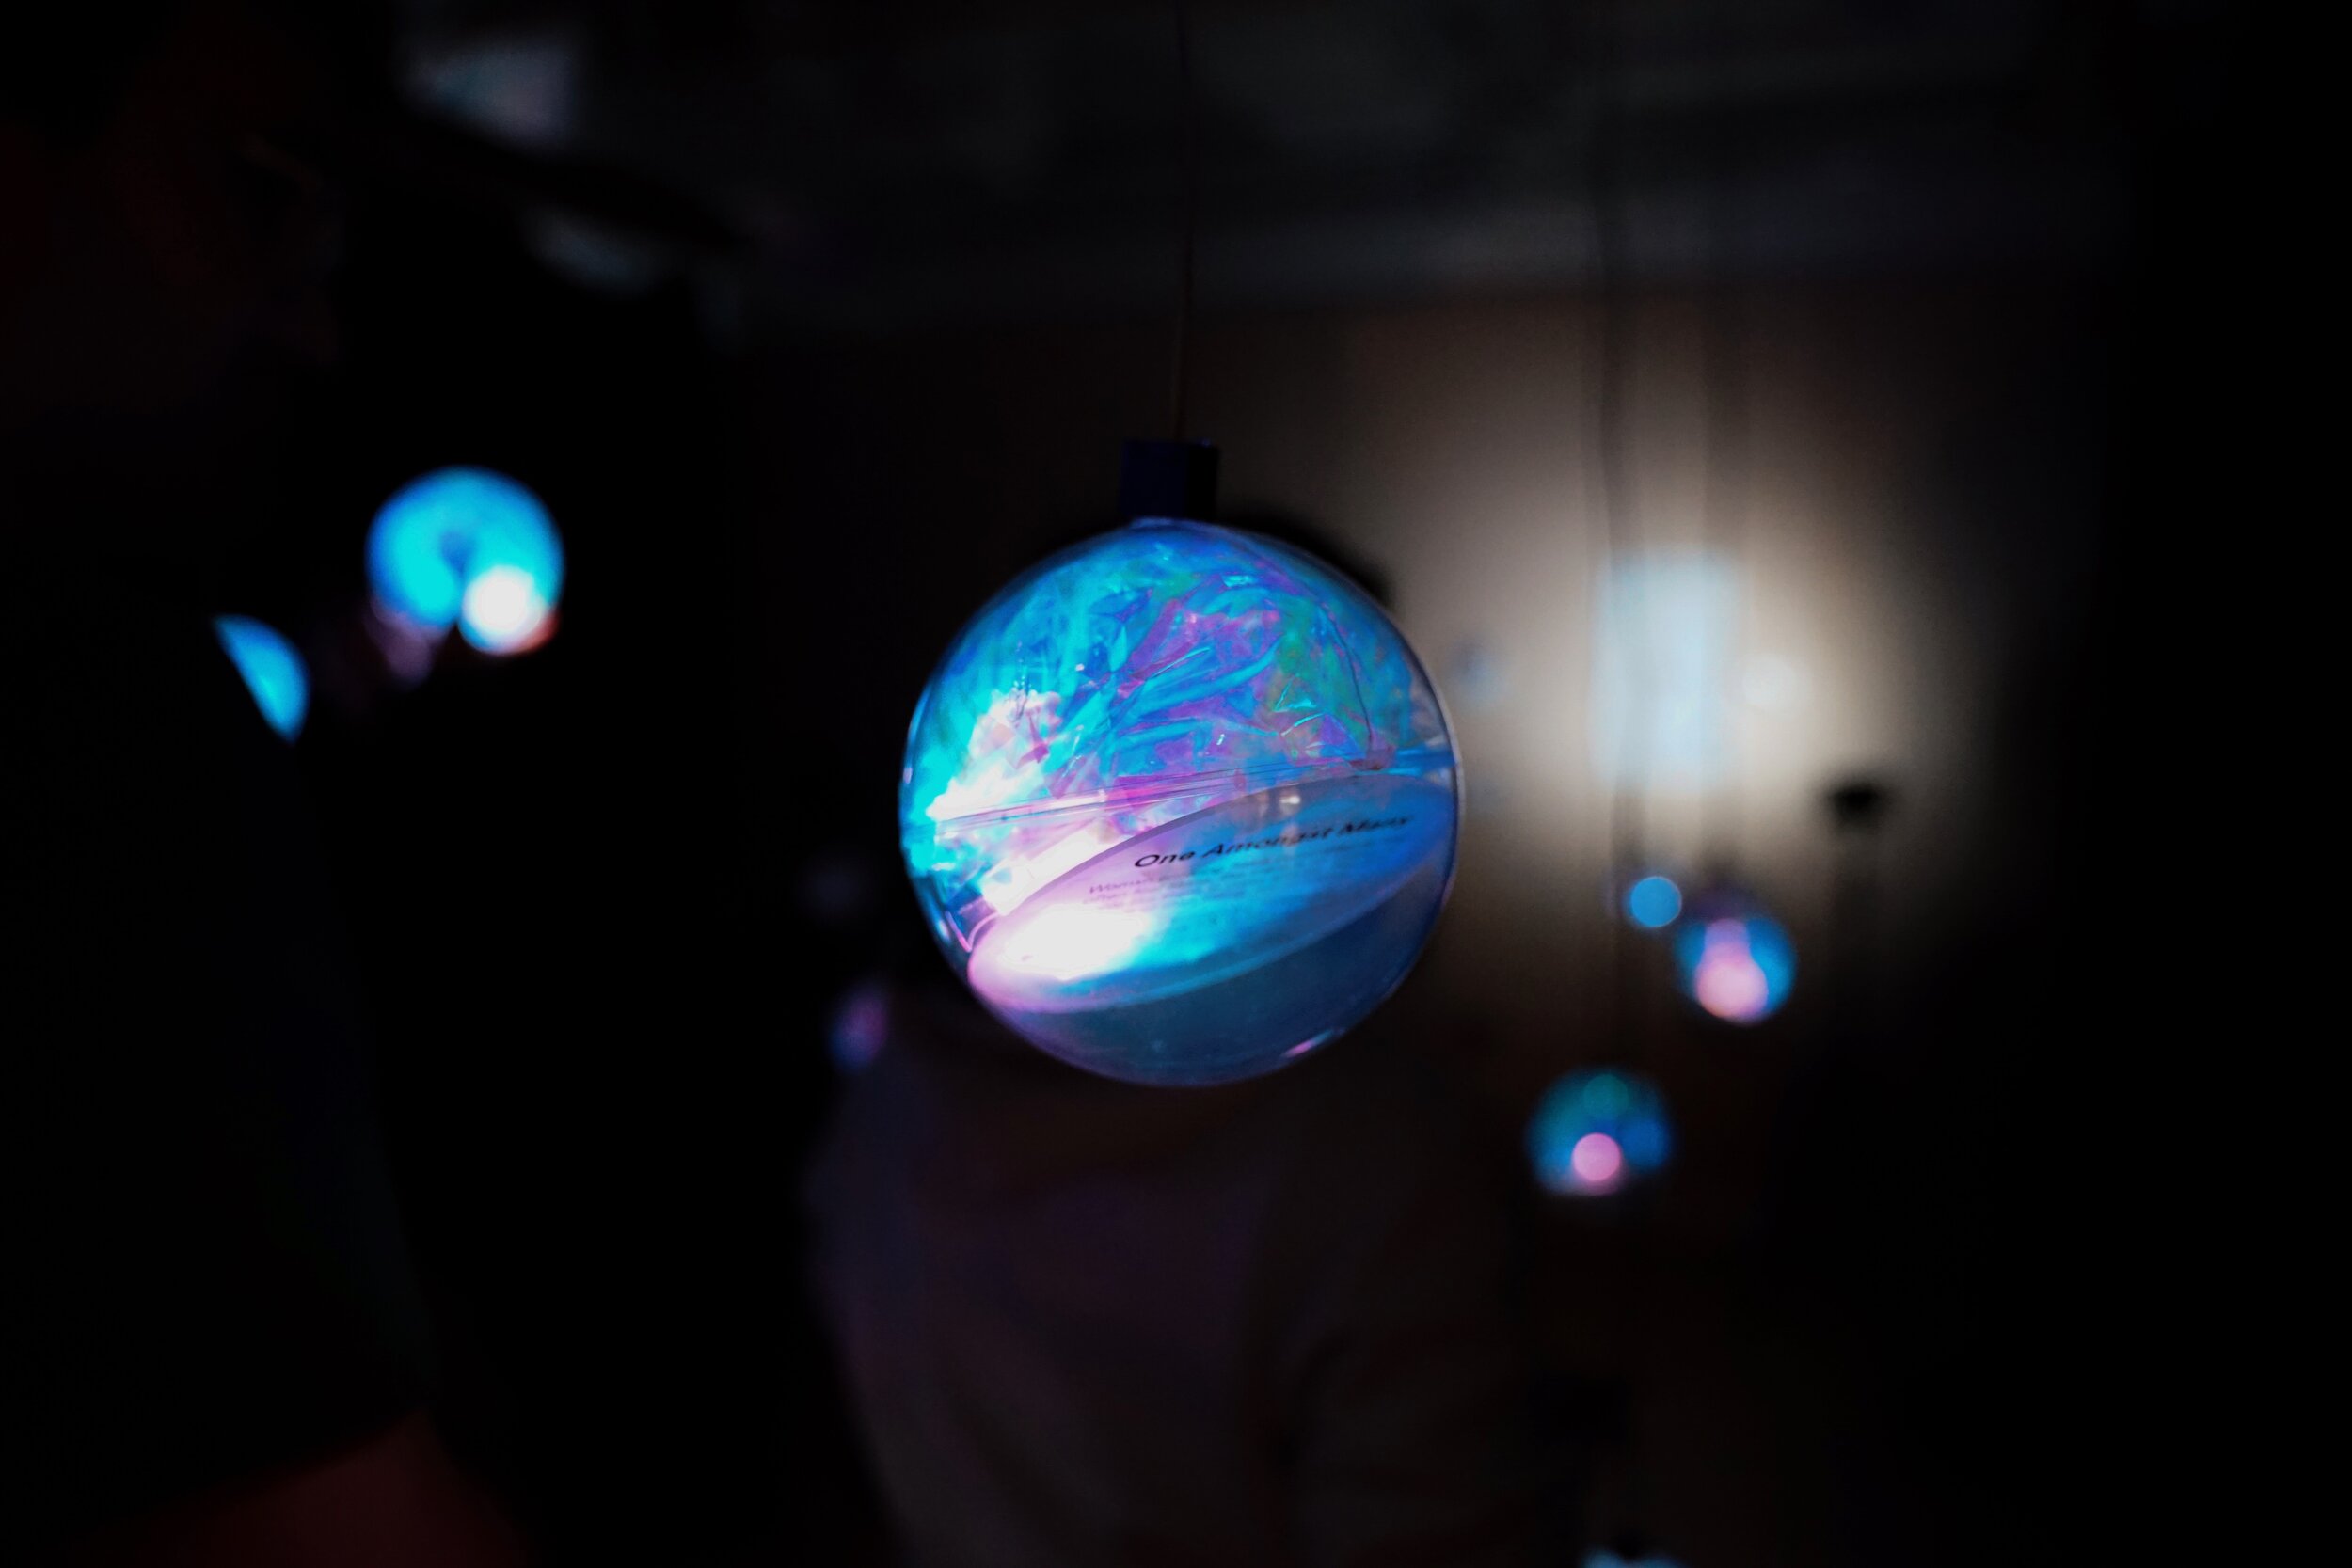
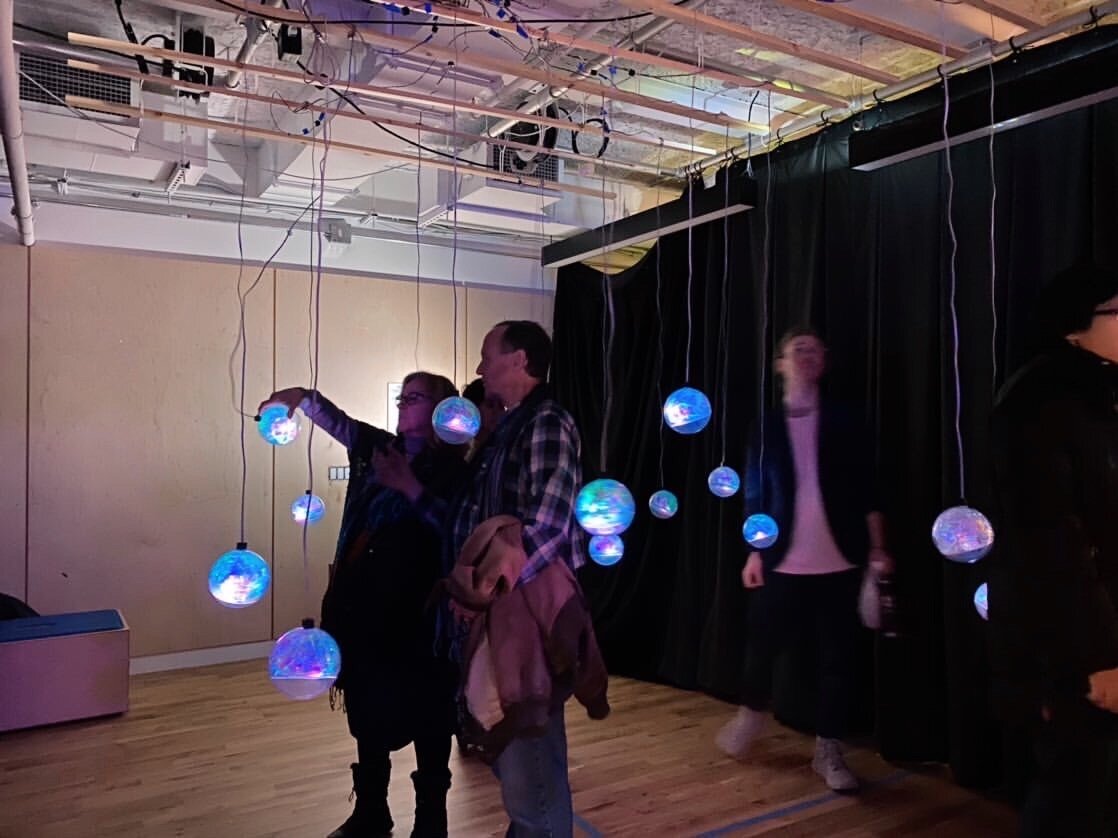
This physical data visualization installation was created to honor 16 women who have had monumental achievements in computing history. Illuminated orbs containing biographical information about the women are suspended from the ceiling; they are placed chronologically in a field based on their times of accomplishment, and their z-heights are correlated to how well known they are through their number of Wikipedia backlinks. When picked up by the audience, each orb will light up to maximum brightness while also prompting other orbs within its cohort to also shine. All orbs start off at near complete dimness. The more times each orb has been interacted with, the brighter its neutral state gets over time, giving the entire installation a visualization of its recent interactions.
Information on each woman can be found on https://oneamongstmany.com/.

TEAM & CONTRIBUTORS
This project was very collaborative; all three of us participated in brainstorming, user experience research, user interviews, interaction design, prototype design, usability testing, technical troubleshooting, etc. Other tasks for delegated:
Tina Rungsawang: Visual Design, 3D Visualization, Fabrication, Documentation, Installation
Christina Dacanay: Fabrication, Project Management, Copywriting, Illustration, Installation
Shirley Wu: Data Analysis, Data Visualization, Arduino, System Communication, Schematics
Physical Computing Course Advisors: Daniel Rozin, Jeff Feddersen
project timeline

CONCEPT
The initial idea for this project came from Shirley, who reached out to Christina and I to collaborate on a physical data visualization (what she mainly came to ITP to do). It didn’t take long for us to settle on our subject the history of women in computing. We discussed big ideas over dinners, brainstorming our ideal emotions, reactions, and interactions from our audience. With my background in user experience design, I naturally posed UX questions like who our target personas were going to be and what unique experiences we wanted for each person.
We decided that our overall theme was going to be “invisibility of women in computing”, and used that was a guide while discussing materials, forms, layout, etc.

Our initial concept notes containing our ideal experiences
BRAINSTORMING & FIRST PROTOTYPE
As Shirley was our resident data viz guru, she spent a good chunk of her time scraping data about women in computing from Wikipedia. Meanwhile, Christina and I compiled references of interactive installations and art that we found inspiring. Christina came across one that stood out to all of us: Judith G Levy’s Memory Cloud. The installation consists of an investigative interaction in each hanging piece, which seemed to match with the type of content and interaction we were going for. We all could visualize a field of interactive, hanging objects that contained information for the audience.

Shirley initially scraped a big collection of data about different women in computing from Wikipedia. After layout out our timeline and manpower, we had to narrow our list of women to under 20. We reviewed information about the top 30 women that showed up on the dataset, and voted on the ones we thought were generally less known and had the most impactful accomplishments.

When we were thinking of materials for our physical data points, I immediately imagined circular clear Christmas ornaments that would hang from the ceiling with reflective coating on it. The reflectivity is to represent the invisibility of each woman, while also beautifully attracting attention. The team agreed that this would be a good idea as they were easily sourced, affordable, and came ready to pop open and close.
We sketched out orb that would contain information inside of the audience to peep through a view-hole, with half of the orb covered with some sort of reflective material. The LED inside would illuminate the information for the one viewer to see, as well as light up the orb’s exterior.

First orb sketch design
We ordered our materials from Amazon and went out to buy rushed pieces at Michael’s to quickly make our first prototype. Christina made a jig and carefully drilled holes into the orbs so that we could wire an LED through. We tested the view-hole with one orb and realized that the inside of the orb was way too close to the viewer’s eye, and changed the design of each orb so that information could be seen through the clear side.

Revised orb sketch design
I had imagined that the reflective part of the orb could be easily achieved with Mirror Effect spray paint, but our first rounds of prototyping failed. The spray paint sadly did not give the mirror effect we had expected.


We carried on with this first set of prototypes anyway, in order to get some feedback for our interaction. I made quick designs for the information that was going inside of each orb, and we laser-etched them onto cardboard. We taped yarn onto a few orbs and hung them from the ceiling of our classroom to see how our classmates would interact with them.


In preparation for the playtest, Christina created a draft experience map to set expectations.

Surprisingly, many of these experiences remained unchanged. We had initially wanted to fabricate an interactive board that also reacted to the orbs, but the fabrication challenges faced early on meant that we scrapped the panel’s interactivity to focus on the orbs’ interaction being successful and effective.
PLAYTESTING
We observed and gathered feedback from our classmates and instructors as they encounter our lo-fi prototypes. Without direction, we recognized three different groups of audience:
Ones who simply looked at our orbs with nervous faces as they reach to poke, not realizing that they were supposed to pick them up to read
Ones who punched, headbutted and swung our orbs around, also not realizing that they were supposed to pick them up to read
Ones who picked then up to read the information inside, exactly as we had intended for them to

Group 1

Group 2

Group 3
We asked our test audience a few questions to further understand their experience.
Questions:
Did you understand the interaction?
How would illumination affect your understanding?
How did the heights of the orbs affect your understanding?
How many of these orbs would you read?
If the information inside were angled so that you could see it better from afar, would it change your interaction?
Feedback and Observations:
The interaction was not immediately clear to most people. Some users either wanted to swing the orbs and play, or not touch them because they looked like art objects.
Light is a hugely important element in the interaction. We only had one prototypes illuminated during the play tests, and most people said they would react differently if they all were illuminated and responsive.
People under 5’5” could readily see some of the information inside the orbs; people over that height had no clue there was something inside.
Users who saw other people reading the orbs immediately understood the interaction and followed suit.
MODIFICATIONS:
We decided to include a “tutorial orb” that tells the user more about the project, and how to interact. Once a person saw another user interacting correctly, the issue of being afraid of touching the orb seemed to solve itself.
The information panel inside of the orb should be tilted, giving it more visibility from afar.
We noticed that the height of the orb was critical to the user’s interaction. We agreed to redesign and test optimal heights.
We decided to group the women into four groups that can be differentiated by color or behavior, to add more variety to the orbs.
REVISION IN MATERIAL AND INTERACTION
To solve our issue with the failed reflective material, Christina came up with a brilliant alternative idea of using iridescent cellophane sheets to line the inside of the orbs instead. We saw how beautiful this material looked on its own, but later were blown away at its effect with light shining through!

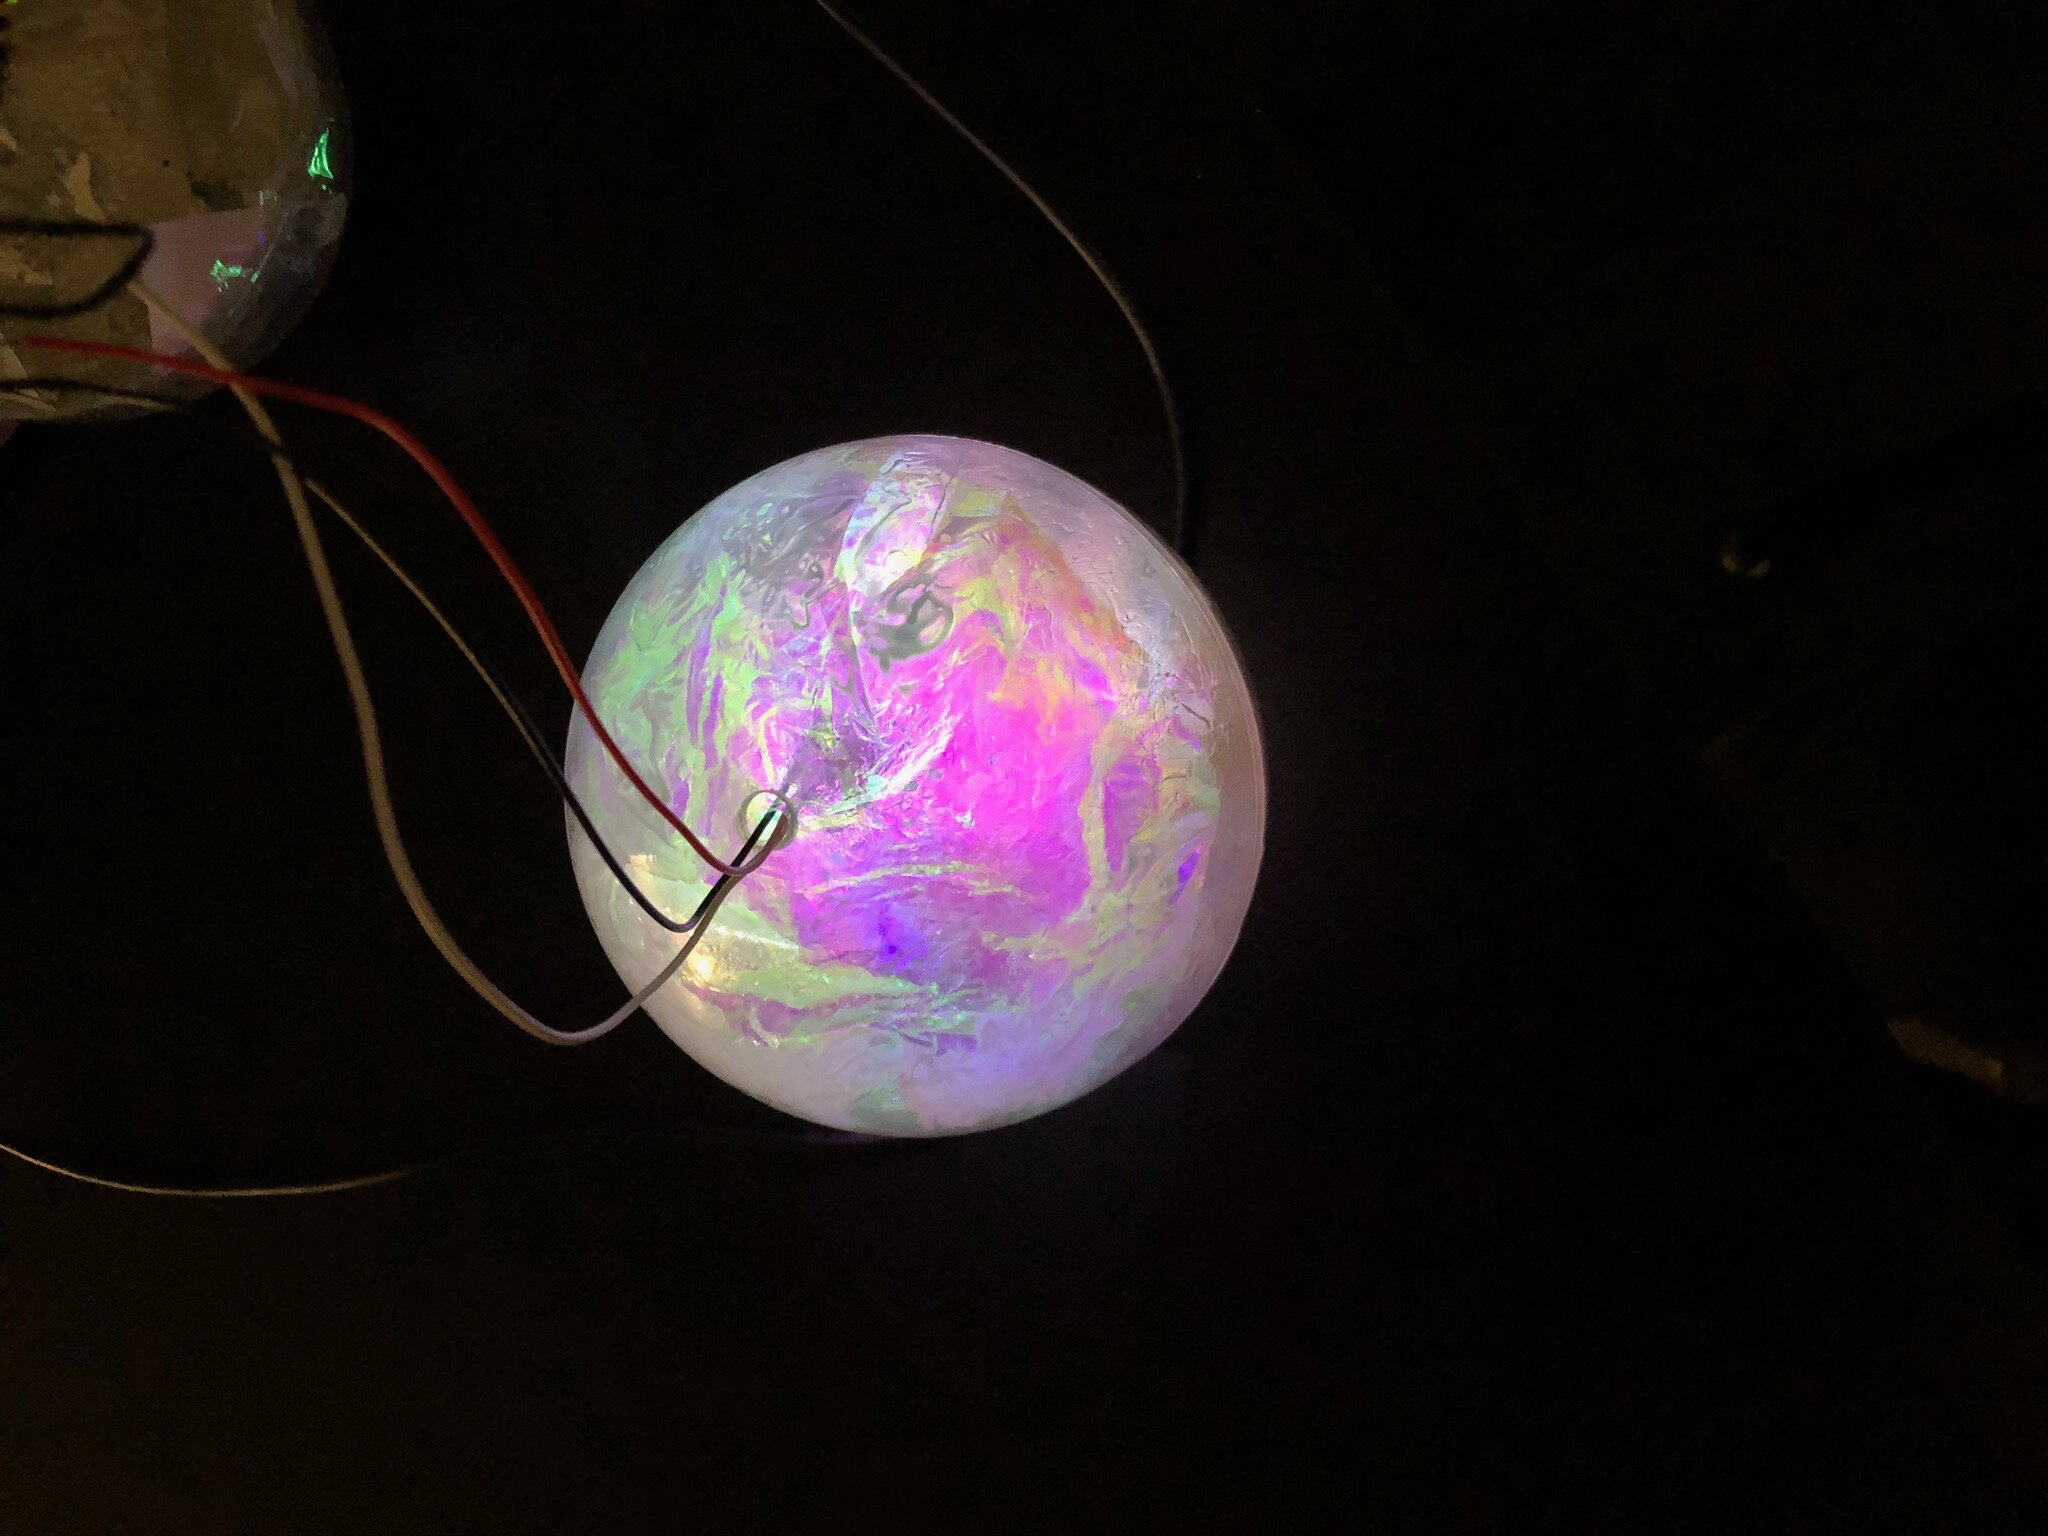
As for the interaction of each orb, we decided on using a tilt switch, which is a sensor that turns on and off depending on its orientation. The metal tube has a little metal ball that rolls around in it; when it’s tilted upright, the ball rolls onto the contacts and completes the circuit. This sensor would control a single NeoPixel inside each orb to turn on and off.
As for the wiring, our advisors suggested we go for RJ11 phone cords and jacks to connect the switch and NeoPixel to the Arduino. These manufactured wires were sturdy enough to carry the weight of our orbs as they’re suspended from the ceiling.


Shirley did the heavy lifting with the Arduino and wrote code that would control the Neopixel to stagger and fade its brightness to respond to those interactions. She also added memory to the NeoPixel so that the more times it has been turned on, the brighter its neutral state gets over time. Christina and I worked on some of the smaller elements (e.g. multiplexers, production and late-stage debugging after connecting multiple NeoPixels and sensors into the Arduino Mega) to support her.


INTERNAL CONNECTIONS
The RJ11 jacks and wires consist of four pins. Our NeoPixel required three connections: power, ground, and data input. The tilt switch required two connections: ground and data input. We decided the two elements can share a single ground wire, so that leaves us with exactly four wires in each orb. I created a 3D model of these elements on Rhino to visualize the connections and their placements within the orb.

Because the tilt switch needed to sit still at a 90 degree angle in order to stay off when it’s not being picked up, we soldered 90 degree angled pin headers onto each tilt switch and NeoPixel.

FINAL USER TESTING
During week 6, we completed a test case of 3 orbs lighting up as expected on the bread board. Again, with support from classmates and professors, we did a usability test to gauge user reactions. In this round of research, we focused on refining the details of our interaction and system communications.


INTERACTION & USABILITY TEST:
The lights changed everything about the interaction. Users felt much more like they understood the interaction and behaved more predictably.
The orbs were reaching full brightness far faster than expected
Keeping all the wires organized for multiple orbs is imperative
Fading the neopixel from neutral to full brightness would be more visually appealing
MODIFICATIONS:
We need to develop an internal system to mark which cords go to which orbs, and where they all need to be wired in the Arduino
Change the incrementation of the orbs brightness from 5 to 1 per tilt
The acrylic chosen for the biographic information would need to be semi-opaque to keep the NeoPixel from making the text too bright to read
Modify the debounce on the extremely sensitive tilt switches
FABRICATION & SCALING
Our major challenge in fabrication was scalability: it was easy enough to make 3 functional orbs, but to create 17 that behaved reliably and could be debugged easily was an intense design challenge. We were also designing a spacial installation for an unknown space, which meant we needed to design everything as units that could be taken apart and moved easily.
Orbs
During the last week of this project, Christina and I spent over 30 hours of soldering! We painstakingly soldered pin headers onto all the the NeoPixels and tilt switches, and soldered wires and female sockets onto the 34 jacks. It was so many connections to manage, I was so excited to see that they all worked the way they were supposed to!


We also finished lining iridescent cellophane sheets onto the insides of all our orbs.

VISUAL DESIGN
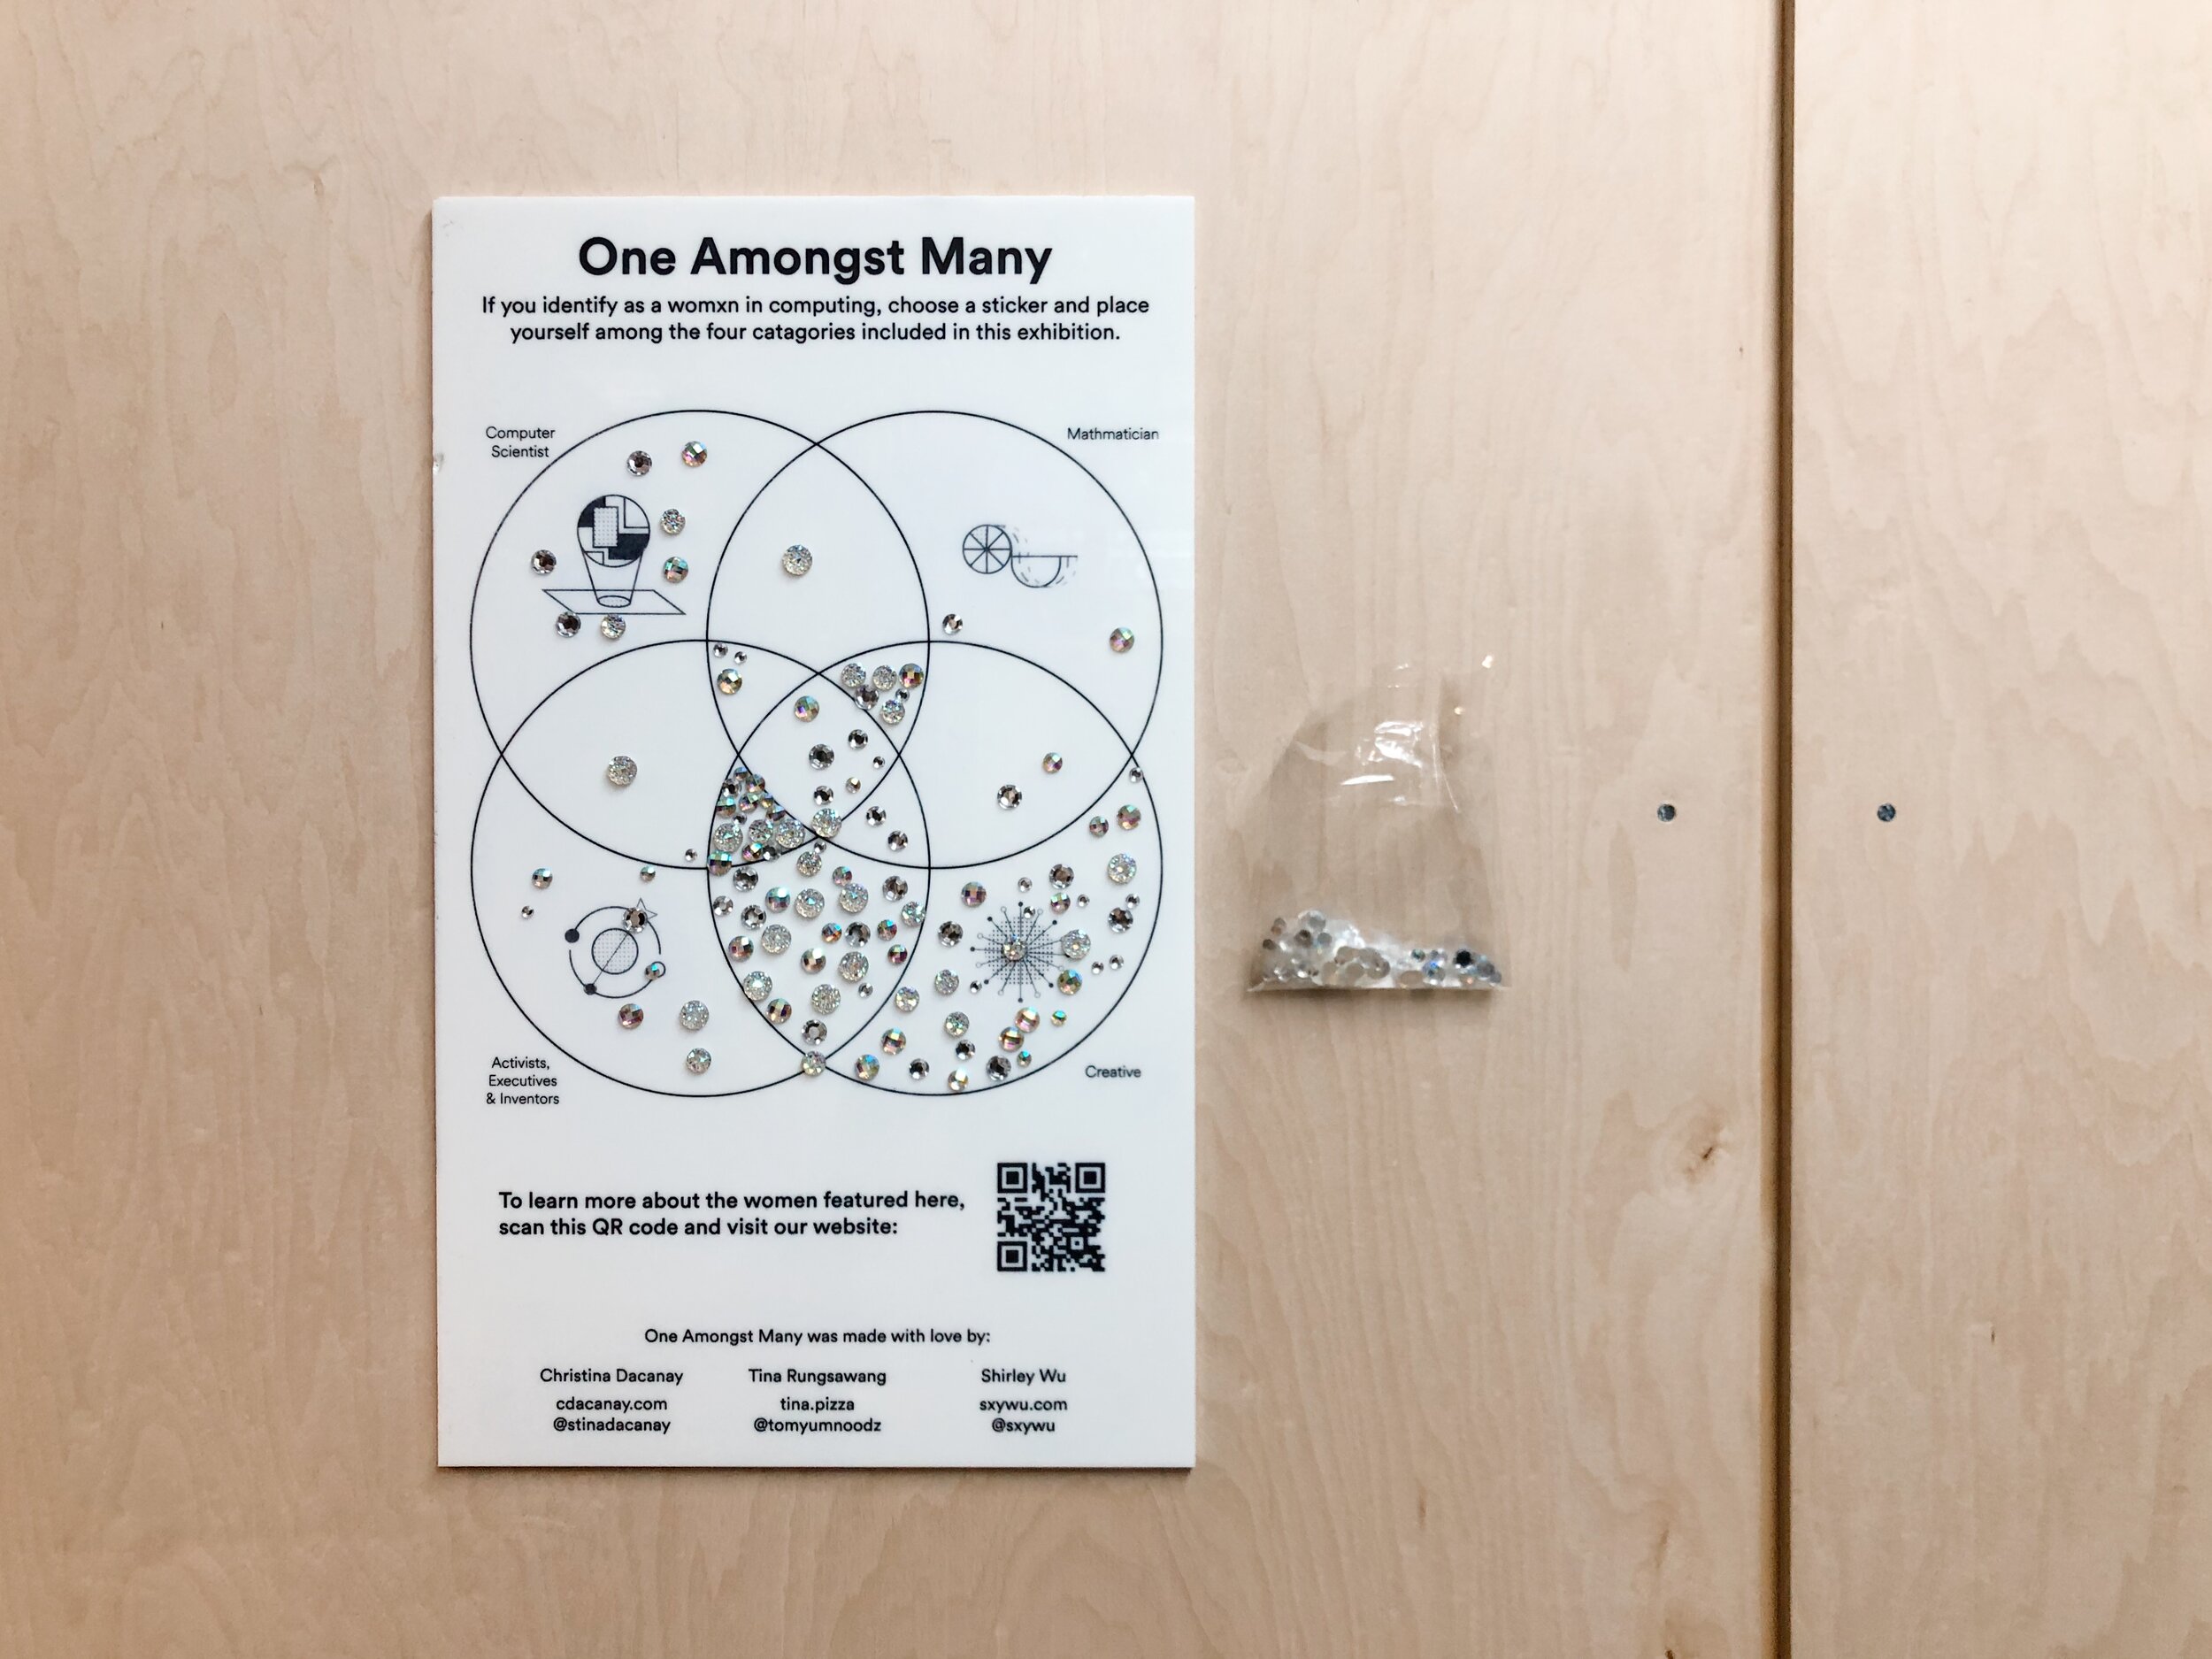
I initially conceptualized the visual design for the inside of the orbs to make sure they were friendly and readable. We all contributed to the way the data was laid out. Christina made conceptual illustrations for the four different groups of women and created the summary board where users could place themselves amongst the different women with our provided diamond stickers.


We laser-etched the vector graphics onto frosted acrylic sheets before laser cutting them into circles that would fit perfectly inside each orb. In order to make our etched text readable, we used a Sharpie technique to color in the etchings.


INSTALLATION Layout
After Shirley had gathered all of her data, she plotted each data point on a field and gave me specific heights for each one. After we were assigned a definite space to display our installation within the ITP Winter Show, I took these mapped numbers and created a 3D model on Rhino to visualize our space with real measurements.

Mapped dataset

3D visualizaton with real measurements
With the help from our classmate Nok Jangkamolkulchai, we bought 8-foot long wood planks from Home Depot and carried them back to campus on the subway the night before the Winter Show. Using the 3D model as a measurement guide, I numbered each wood plank, drilled holes into them, and wired each phone cord in accordingly, measuring exactly how long each one had to be based on our data. To hang these planks, we drilled holes and wired in zip-ties to hang them off of the exposed pipes that were already on the ceiling.


After putting up all the planks with phone cords and jacks attached, we then connected the jacks onto our Arduino wires and each orb onto the phone cords. Everything had to be pre-labeled to make sure we were making the correct connections.To power up our Arduino, we used an iPhone USB power adaptor that connects to the wall plug. It was the ultimate satisfaction moment when we finally plugged it in and everything lit up as planned!
ITP WINTER SHOW 2019
Over a two hundred people interacted with One Amongst Many and we received such positive, heartwarming feedback. Lots of women of varying ages talked to us about how much it meant to them that they were learning about these women who they had never heard of. The orbs worked reliably, the effect was beautiful, but the most rewarding experience was watching people put themselves on the summary board. Mothers brought their daughters to our experience and discussed which orbs were their favorites. We also had so many women thank us for finally making all of us as a gender more visible.
DREAM TEAM
Working with Christina and Shirley had been such a blessing for me! I learned so much from these two talented women, who both have inspired and motivated me to complete a project so big in scale with such a meaningful purpose behind its beautiful execution. Our skillsets both overlapped and complimented each other in varying ways, and we were able to work things through very smoothly as a team within the stressful timeline. I’m very proud of us!
Special thank you to our advisors, Danny and Jeff, who were very encouraging and gave us consistent, helpful feedback. Also more thanks to ITP residents Anthony Bui and Jesse Simpson who helped gave us great suggestions regarding electronics, and Nok Jangkamolkulchai again for taking beautiful photos for us!
